LEARN POLYPAD
3 PUBLISHED · MORE ON THE WAY- 01MODELING · START HEREParametersName a dimension once, reuse it in formulas, and every value linked to it follows when you change it. Video Article
- 02SKETCHINGSplinesDraw a curve with anchors and handles, close it into a shape, then extrude, cut or revolve it. Video Article
- 03AI MODELING · NEWModel with ClaudeConnect Claude to your open Polypad tab, describe a part in plain words, and watch it model a wall mount for a WD My Essential drive. Video Article
01 / THE FLEXIBLE WAY TO MODEL
One change. A smarter part.
A wider enclosure. A thicker wall. A different fit. Parameters let you name the dimensions that matter, so your design is easier to change without chasing numbers.
Give dimensions meaning
Use names like width or wall_thickness, so you can see what each value controls.
Keep dimensions connected
Use formulas to express relationships. A value like width / 2 stays linked to width.
Make the next version faster
Change a parameter and the dimensions using it update. Try a new size without rebuilding your part.
FROM WATCHING TO MAKING
Make your first
parameter.
A name, a value, and somewhere to use it. That's all you need to start.
- Name it.Open Parameters, choose Add parameter, and create
widthwith a value of60and kind Length. - Use it.Enter
widthin a box's width field. You can also use a formula such aswidth / 2in another dimension. - Change it.Edit
widthin Parameters. The dimensions linked to it follow along.
width / 2Move the slider. The depth stays half the width.
02 / SMOOTH CURVES
Sketch a curve, then build with it.
A spline is a smooth curve that you shape with anchors and handles. It is useful wherever lines and arcs don't fit, such as the outline of a vase, a knob or a rounded bracket. The video draws a spline, closes it, and revolves it into a solid, including what Polypad offers when the outline crosses the axis.
Click for corners, drag for curves
A click places a corner. Pressing and dragging places a smooth anchor, and the handle you pull sets how the curve enters and leaves it.
Close it to make a shape
Click the first anchor to close the path. A closed spline is an outline like any other, so you can extrude, cut or revolve it.
Keep adjusting afterwards
Select an anchor to show its handles and drag them. In the inspector you can set an anchor to Corner, Smooth or Symmetric.
FROM WATCHING TO MAKING
Draw your first
spline.
Half an outline is enough to get a round part. Revolving it does the rest.
- Start the tool.In a sketch, choose Spline in the Draw palette or press
P. - Place anchors.Click for a corner. Press and drag for a smooth anchor. Hold
Altwhile dragging to break the handle, so each side bends on its own. - Finish or close.Press
Enterto keep the path open, or click the first anchor to close it into a shape. - Revolve it.Keep the outline on one side of the axis. If it reaches across, Polypad shades the part that is over in red and shows by how much. It offers to move the whole shape clear in one click, or to use a different axis. The shape keeps its size and form, and undo takes the move back.
What you can do with a spline
- Extrude or cut a closed spline, like any other outline.
- Revolve it around the sketch's X or Y axis, or around a line you drew, to make vases, bottles and knobs.
- Join it to lines and arcs. Drag an end onto another end and Polypad asks whether to join them or close the spline.
- Set dimensions and rules on its points, the same as on other sketch shapes.
Good to know
- Trim, Extend and Offset don't work on splines yet, and a spline can't be a sweep path.
- Splines are drawn on desktop. A sketch that contains one opens read-only on a phone.
03 / CLAUDE + MCP
Using Claude to assist with the design
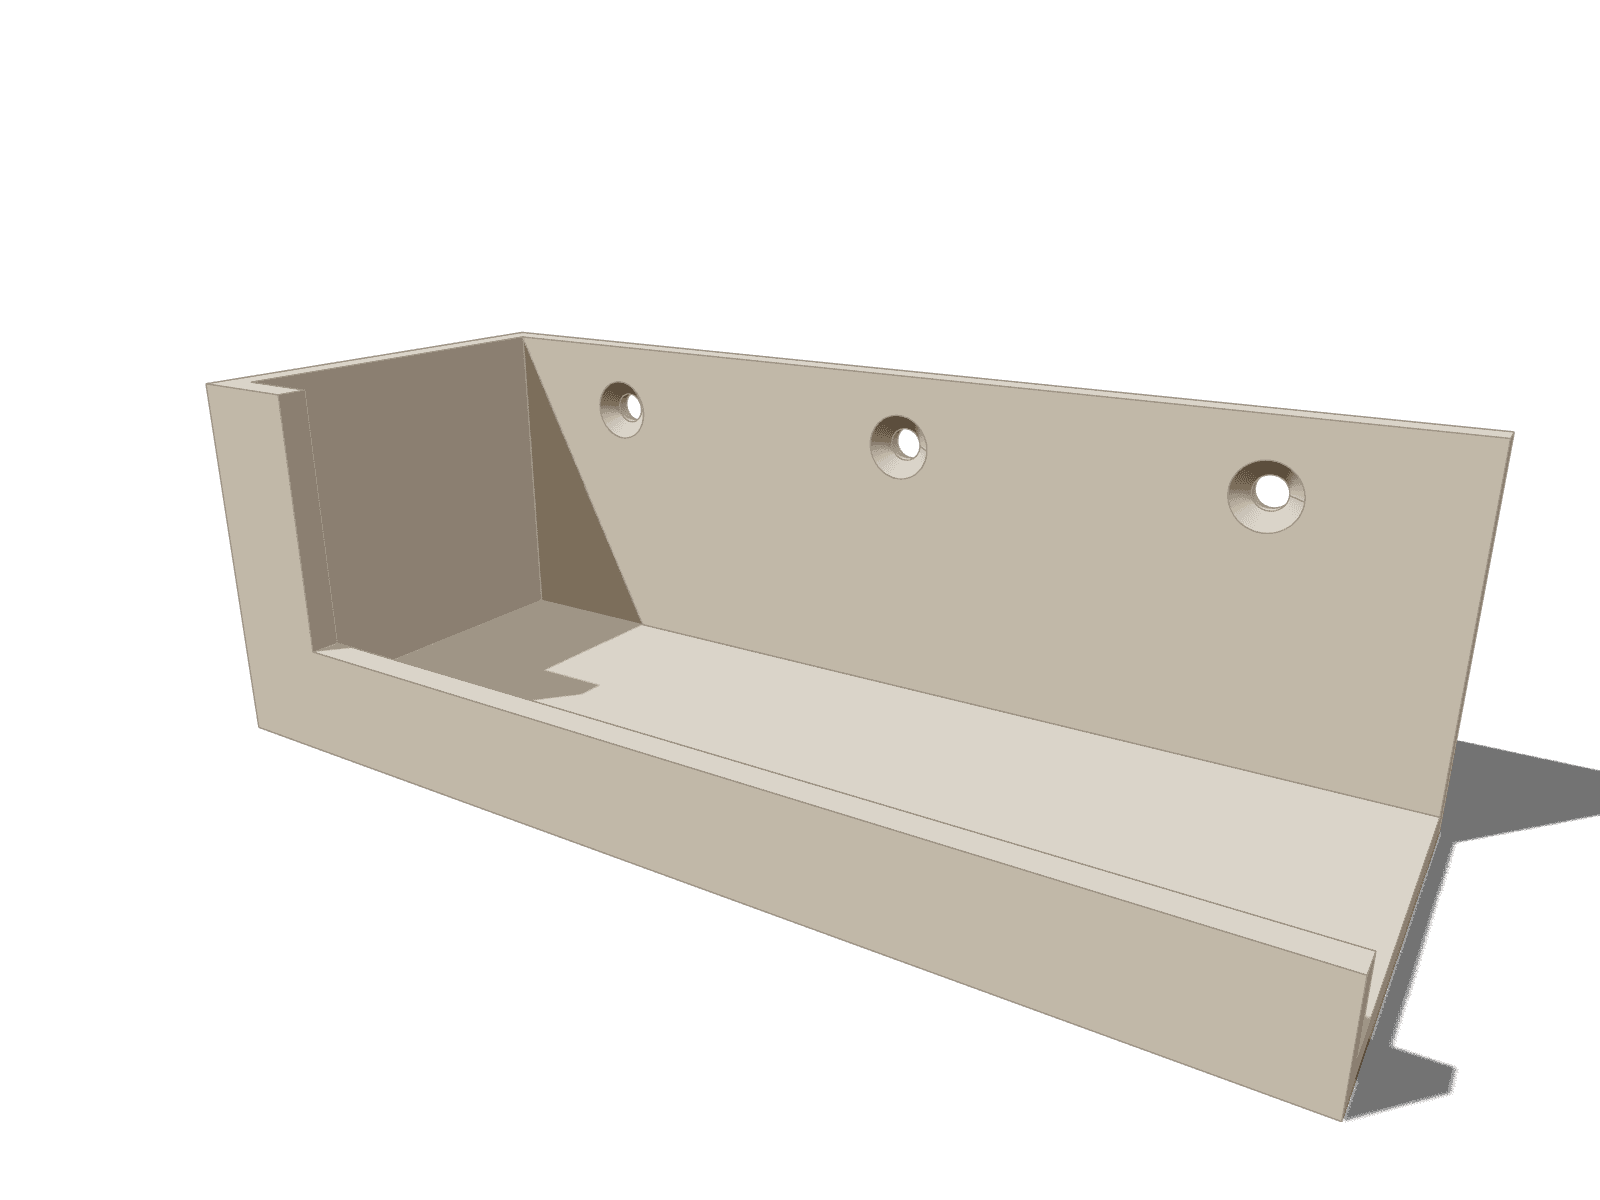
Example showcase: Claude Desktop, connected through Polypad's remote MCP connector, models a wall mount for an external hard drive in the tab you have open.
Connect once
Copy your Claude link from Polypad and add it to Claude as a custom connector. After that, Polypad is one of Claude's tools.
Describe it like a brief
Give sizes, clearances and screw holes, and name the tools to use, such as the hole tool and pattern hole for a row of screws.
Stay in control
You watch every step, each one is one undo away, and you can edit the result afterwards like any part you modelled yourself.
HOW TO MAKE IT WORK
Connect Claude
to Polypad.
Four steps, and the connection works for as long as you keep the link.
- Open Connect AI.In a Polypad project, choose Connect AI in the editor, pick “Claude (web, desktop, mobile)” and copy Your Claude link.
- Add the connector.In Claude Desktop, open Settings → Connectors → Add custom connector. Name it Polypad and paste the link.
- Turn it on.In a chat, turn Polypad on in the tools menu. Try “make a 40 mm cube in Polypad” first.
- Send your brief.Paste the prompt below, or your own, and watch the model build in the tab.
Good to know
- The link is personal. Anyone who has it can use Polypad in your open tab, so treat it like a password and don't share it.
- Claude only sees the project you have open. Keep that tab open while it works.
- Claude Code and Cursor can use the same link, or the local app.
The prompt
Use the Polypad mcp to model a 3D printable wall mount for a WD My Essential external HDD (placeholder size: 140 × 140 mm face, 50 mm thick)

Design:
- The drive's big face goes against a flat back plate. The plate is screwed to the wall, and the drive stands in a short cradle at the bottom, held at the front by lips.
- Everything is 4 mm thick, and the whole mount is 5 cm tall. The plate is about 149 mm wide and 50 mm high.
- The cradle has a 51 mm deep pocket, which gives 0.5 mm clearance around the 50 mm thick drive. It has a bottom ledge, one 5 cm high side wall on the left, and a front lip on each of those walls. The lips are 4 mm thick and 15 mm wide, and they overlap the front of the drive.
- There is no right wall and no top wall. The right side stays open for cables, and the drive drops in from the top.
- 3 countersunk M4 screw holes in one row through the back plate, evenly spaced and centered, with their centers 1 cm below the top edge of the plate. The countersinks face the inside of the cradle.
- Add a red 140 × 50 × 140 box as a placeholder drive, sitting in the cradle. Build it from boxes unioned into one body.

Use the hole tool, not sketched circles, and use pattern hole for the row. When you're done, check that the drive fits with 0.5 mm clearance.
The result
YOUR TURN
Build a little flexibility into your next part.
Open a project and try your first parameter, or connect Claude. No account needed.